
Home-made PVR
Written by John Yan on 10/10/2002 for
More On:
TiVo’s and ReplayTVs are getting more popular nowadays with the advanced features that you have to control the TV at your fingertips. If you ask Dan, he’ll tell you that he cannot live without one anymore. Rather than spending money on a unit for myself, I decided to create a digital VCR through various spare parts and rummages through used parts places. Here’s a recount of what I used and how I got it running.
First thing I needed was a case. As much as I liked towers and such, I thought a desktop would go well with my entertainment center. You don’t see many places selling ATX desktops nowadays so finding one locally or online was a little tough. I didn’t want to spend too much and all the cases online were in the $50 range without shipping. Cases are a little heavy so shipping was a bit much. Out of curiosity I visited a local old computer parts seller. As luck would have it, I ran into a stash of old Gateway E-3000 desktops.
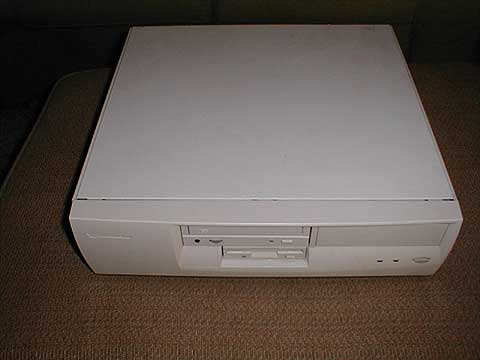
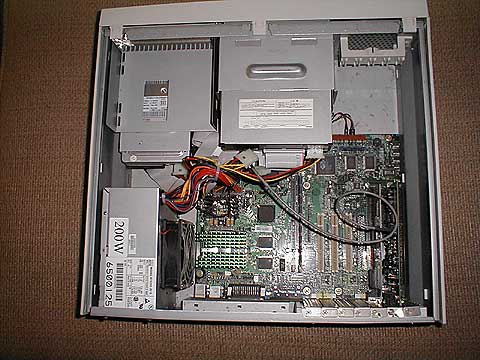
The stack I ran through was all Pentium 200’s but the size and shape of the case was perfect. The beige color and stickers would have to go though. I found one in the stack for $35, not bad for a full working computer and certainly cheaper than 95% of the cases I found online. Popping it open, I saw that it had a 200W ATX power supply. I would’ve liked to change it with one of my spare 300W ones but the case didn’t allow for it to fit. So, I stuck with the 200W and hoped for the best.
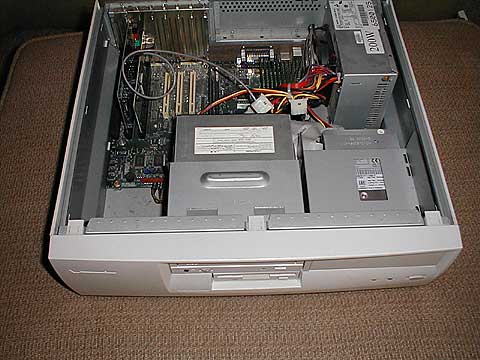
What’s nice about the Gateway case was the CD-Rom and floppy drive were in a removable cage that was held on by two screws. The hard drive was also in a cage that was also easily removed by unscrewing a few screws. Pulling the two out, I had easy access to all the motherboard screws.
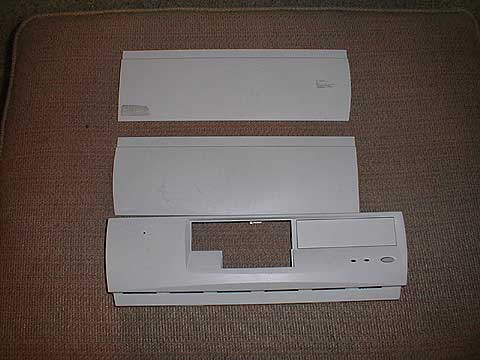
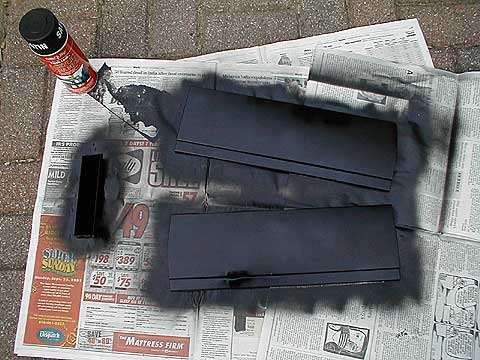
Like I said, the beige color had to go so I went out to Home Depot to pick up a $3 can of satin black spray paint. The side panels, front panel, and top of the case came off easily. There was one screw holding the power button in place and the LED tubes were easily snapped out. After taking the two out of the front panel, I placed all the pieces on the ground and proceeded to spray paint it black.
Most software I see that does real time encoding suggests at least a 700Mhz processor. With AMD processors dropping in prices, I snatched up a good ole Duron 1.2Ghz for $45. The Duron 1.2Ghz should provide more than enough power to record shows, play some ole MAME games, and play MP3’s. If I need more power, I can pick up an Athlon XP 1600+ for a very cheap price of $56 at this time of writing. The Duron I had from a few months ago so I decided to stick with it rather than upgrade the CPU. Attached to it is a Dragon Orb 3, which I picked up from a local computer show for $25. The motherboard is the ECS K7S5A featuring the SIS chipset and allows for both DDR and SDRAM. Given volatile ram prices, I chose the motherboard with both slots just so that I can get the cheapest ram available. Being a PVR and not a game machine, I didn’t need the fastest motherboard or ram out there but just something stable. I’ve had the K7S5A as my main board for a few months and it ran really well. My local Microcenter had a sale on PC133 ram at $40 for a 256 meg stick so rather than go through online and maybe save a few bucks I decided to just pony up the dough for the memory. Oh the motherboard was $55.
What’s nice about the K7S5A is that it has onboard sound and a 10/100 card so that was two less purchases that need to be made. I’m planning on putting a DVD-ROM drive in there in the future and when that happens, I am going to invest in a sound card that outputs in 5.1 so I can enjoy the rich surround sound of DVD movies. Until then, I can deal with 2-channel stereo since this machine’s just going to be a PVR/MP3 station/MAME machine. The network connection is essential for grabbing the TV Guide from a website or to transfer files to and from the machine. And in some programs, you can even use your Internet browser to program the recording schedule from an off site location. Pretty handy when you’re sitting at the office and forget to set the PVR to record an afternoon baseball game or a soap for your significant other.

As for as TV cards go, I had an old WinTV PCI card lying around that was gathering dust. It’s not a high-end card, no stereo output, and doesn’t do anything fancy but in a pinch it’s an adequate card. There’s a few better ones out there from ATi, Hauppauge, and Avert to name a few but for now, I’ll stick this one in and get it working before I invest in a brand new one. Original purchase price was $35.
For my all purpose video card, I had a few lying around to choose from. Since I needed an output to my TV, I went with my old ASUS V3800 card. It’s a TNT2 with various inputs and outputs for video. It’s not the clearest output on the TV but for right now it’ll do. I’d like to upgrade this to a Matrox or ATi card in the future as I’ve read they produce a better TV out picture. I’ll say, roughly, $40 for a decent card with TV out and some 3D acceleration that you might want just for kicks like having that cool Aquarium screensaver from www.fish-byte.com.Hard drive space is probably the one of, if not the most important piece of a PVR. Without adequate space, you can’t record more than a few shows at a good resolution so the bigger the HD, the better. I’ve seen a few 100GIG HD’s drop in price to around 1$ a gig and that’s pretty damn good right now. For now, I had a spare 30 GIG IBM HD (shiver) that I could give up to run the machine for a bit. A good 800 Megs will be taken up by the operating system but that’s ok. Prices are dropping enough that if and when I feel I need more space, I can upgrade easily.
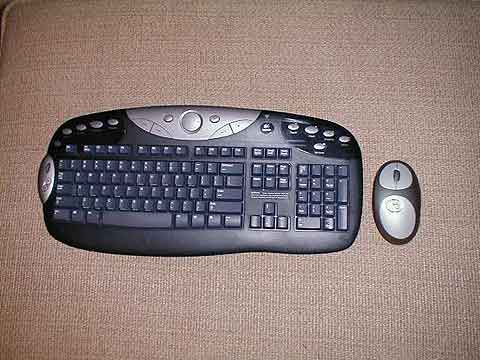
In controlling the multimedia machine, I wanted something that was definitely wireless and used radio frequency so I didn’t have to point the controllers towards the machine. For the keyboard and mouse, I chose the sleek looking Logitech Cordless Freedom Optical. It’s a $99 setup, but I think it’s well worth it for this type of machine. On the Cordless Freedom Optical keyboard are a plethora of multimedia controls that will help you control the machine without having to use the mouse. If you do need the mouse, the cordless optical mouse will provide you with the ability to move the cursor around on almost any surface. The freedom of using the optical mouse on various surfaces such as a couch cushion or a coffee table is really convenient. No searching for a flat hard surface to roll that old mouse ball around. The black keyboard helps match the entertainment center look that I’m trying to achieve. Also the range was around ten feet from the unit so it was long enough to get to my living room couch.
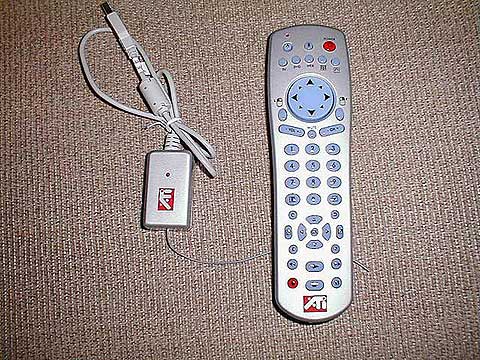
Another controller that you might want to consider is a remote control. There are a few on the market ranging from simple remotes to do it all PC remote controllers. One of those multi-functional remotes that I had was the ATi Remote Wonder. This RCA like remote uses radio frequency also so you don’t have to point the remote to have it work. It features a USB receiver and even doubles as a wireless mouse. You can pick up one for around $50. The only problem is that the TV functions such as channel changing will only work with ATi TV products or so it says. We’ll see if there’s a PVR program out there that will allow you to use the ATi buttons to control the unit.
You’ll probably need a router and you might need a hub/switch if you want to share your broadband connection with your new PVR. I had the SMC 7040BR 4-port router to route my Internet traffic and stuck a cheapie old hub in the living room to share my connections with my PVR, XBOX, PS2, and my laptop. The router was purchased for $50 and the hub I can’t remember as I had it many years ago. You can get a good switch or hub these days for around $30 so let’s just pick that as the price.
I had to have a CD-Drive initially to install the OS so it was nice that my purchase of the old Gateway system had one intact and working. I made a boot disc on a CD so that way I wouldn’t need a floppy drive. A CD boot disk as saved me a lot of headaches and if you can, I suggest making one for those emergency situations.
For the operating system, I chose to go with Windows 2000. It’s stable, reliable, and doesn’t take up as much space as Windows XP. As much as I wanted to use Windows XP as I think it’s a very good OS, I had a spare copy of Windows 2000 to use after upgrading my own machine from Win2K. I would refrain from using Windows 98 SE as it’s not as stable as Win2K and you might need that stability if you plan on having your PVR running for a long period of time without shutting down.
There are a few PVR programs out there and here are a few you can check out:
SnapStream
CyberLink PowerVCR
Intervideo WinPVR
ShowShifter
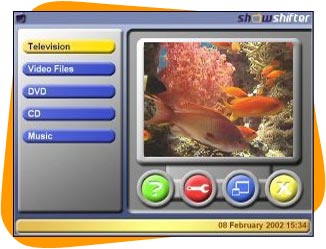
In the end I chose ShowShifter. It’s not just a PVR program but does much more such as plays DVDs and music. It also features a GUI where the letters and buttons are nice and big for TV viewing. You can even skin it to however you like so you’re not stuck with how it looks. Another nice feature of the product is you can specify the codec to compress your shows saving space on the hard drive. Easy recording can be accomplished by the integration of TitanTV.com to the program. You’ll be able to get a list of upcoming shows and easily record with one click. It’s a pretty slick program and you can find out more info at their website.
 So here we have my homemade PVR sitting on my entertainment center. I know the beige floppy doesn’t really help in terms of aesthetics but they will be replaced with black components later on. I did take the front bezel off my old Toshiba DVD-ROM drive and spray paint it black to match the case. I must say it turned out pretty well and was easy to do instead of purchasing another DVD-ROM drive with a black bezel.
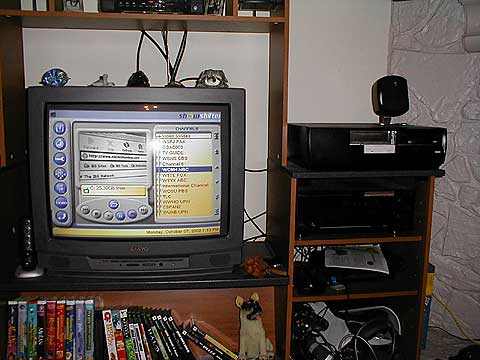
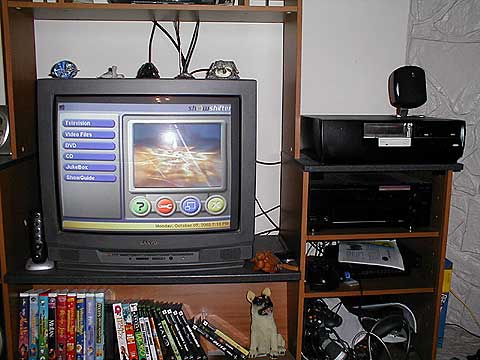
As you can see from the picture, I can watch TV, pause live TV, and record all from a machine I put together through spare parts and some purchases. The output quality was ok and I can certainly get better parts to improve the picture quality. Recording worked as advertised and I can now use my web browser to log into my machine to set the programming. And everything is upgradeable so you’re not stuck with a unit that can’t change with the times. There are still some tweaks here and there but all in all I’ve recorded a good amount of shows with it. The unit’s fan noise is a little louder than I had wanted but it’s nothing that I can’t handle. There are a lot of fans out there that offer good cooling at lower decibels. The Dragon Orb does produce some loud noise though so that might be one of the first things I replace later on to make the system quieter. Hope this gives you a little taste on how to put together one.
Total Cost--
Case: $35
Paint: $3
Duron 1.2: $45
ECS K7S5A motherboard: $55
256 PC133 Ram: $40
Dragon Orb HSF: $25
WinTV PCI: $35
TNT2 w/ TV-out: $40
30 GIG HD: $60
Logitech Cordless Freedom Optical: $100
Windows 2000: $100
Showshifter: $50
Final Cost: $588 (router not included)
First thing I needed was a case. As much as I liked towers and such, I thought a desktop would go well with my entertainment center. You don’t see many places selling ATX desktops nowadays so finding one locally or online was a little tough. I didn’t want to spend too much and all the cases online were in the $50 range without shipping. Cases are a little heavy so shipping was a bit much. Out of curiosity I visited a local old computer parts seller. As luck would have it, I ran into a stash of old Gateway E-3000 desktops.
The stack I ran through was all Pentium 200’s but the size and shape of the case was perfect. The beige color and stickers would have to go though. I found one in the stack for $35, not bad for a full working computer and certainly cheaper than 95% of the cases I found online. Popping it open, I saw that it had a 200W ATX power supply. I would’ve liked to change it with one of my spare 300W ones but the case didn’t allow for it to fit. So, I stuck with the 200W and hoped for the best.
What’s nice about the Gateway case was the CD-Rom and floppy drive were in a removable cage that was held on by two screws. The hard drive was also in a cage that was also easily removed by unscrewing a few screws. Pulling the two out, I had easy access to all the motherboard screws.
Like I said, the beige color had to go so I went out to Home Depot to pick up a $3 can of satin black spray paint. The side panels, front panel, and top of the case came off easily. There was one screw holding the power button in place and the LED tubes were easily snapped out. After taking the two out of the front panel, I placed all the pieces on the ground and proceeded to spray paint it black.
Most software I see that does real time encoding suggests at least a 700Mhz processor. With AMD processors dropping in prices, I snatched up a good ole Duron 1.2Ghz for $45. The Duron 1.2Ghz should provide more than enough power to record shows, play some ole MAME games, and play MP3’s. If I need more power, I can pick up an Athlon XP 1600+ for a very cheap price of $56 at this time of writing. The Duron I had from a few months ago so I decided to stick with it rather than upgrade the CPU. Attached to it is a Dragon Orb 3, which I picked up from a local computer show for $25. The motherboard is the ECS K7S5A featuring the SIS chipset and allows for both DDR and SDRAM. Given volatile ram prices, I chose the motherboard with both slots just so that I can get the cheapest ram available. Being a PVR and not a game machine, I didn’t need the fastest motherboard or ram out there but just something stable. I’ve had the K7S5A as my main board for a few months and it ran really well. My local Microcenter had a sale on PC133 ram at $40 for a 256 meg stick so rather than go through online and maybe save a few bucks I decided to just pony up the dough for the memory. Oh the motherboard was $55.
What’s nice about the K7S5A is that it has onboard sound and a 10/100 card so that was two less purchases that need to be made. I’m planning on putting a DVD-ROM drive in there in the future and when that happens, I am going to invest in a sound card that outputs in 5.1 so I can enjoy the rich surround sound of DVD movies. Until then, I can deal with 2-channel stereo since this machine’s just going to be a PVR/MP3 station/MAME machine. The network connection is essential for grabbing the TV Guide from a website or to transfer files to and from the machine. And in some programs, you can even use your Internet browser to program the recording schedule from an off site location. Pretty handy when you’re sitting at the office and forget to set the PVR to record an afternoon baseball game or a soap for your significant other.
As for as TV cards go, I had an old WinTV PCI card lying around that was gathering dust. It’s not a high-end card, no stereo output, and doesn’t do anything fancy but in a pinch it’s an adequate card. There’s a few better ones out there from ATi, Hauppauge, and Avert to name a few but for now, I’ll stick this one in and get it working before I invest in a brand new one. Original purchase price was $35.
For my all purpose video card, I had a few lying around to choose from. Since I needed an output to my TV, I went with my old ASUS V3800 card. It’s a TNT2 with various inputs and outputs for video. It’s not the clearest output on the TV but for right now it’ll do. I’d like to upgrade this to a Matrox or ATi card in the future as I’ve read they produce a better TV out picture. I’ll say, roughly, $40 for a decent card with TV out and some 3D acceleration that you might want just for kicks like having that cool Aquarium screensaver from www.fish-byte.com.Hard drive space is probably the one of, if not the most important piece of a PVR. Without adequate space, you can’t record more than a few shows at a good resolution so the bigger the HD, the better. I’ve seen a few 100GIG HD’s drop in price to around 1$ a gig and that’s pretty damn good right now. For now, I had a spare 30 GIG IBM HD (shiver) that I could give up to run the machine for a bit. A good 800 Megs will be taken up by the operating system but that’s ok. Prices are dropping enough that if and when I feel I need more space, I can upgrade easily.
In controlling the multimedia machine, I wanted something that was definitely wireless and used radio frequency so I didn’t have to point the controllers towards the machine. For the keyboard and mouse, I chose the sleek looking Logitech Cordless Freedom Optical. It’s a $99 setup, but I think it’s well worth it for this type of machine. On the Cordless Freedom Optical keyboard are a plethora of multimedia controls that will help you control the machine without having to use the mouse. If you do need the mouse, the cordless optical mouse will provide you with the ability to move the cursor around on almost any surface. The freedom of using the optical mouse on various surfaces such as a couch cushion or a coffee table is really convenient. No searching for a flat hard surface to roll that old mouse ball around. The black keyboard helps match the entertainment center look that I’m trying to achieve. Also the range was around ten feet from the unit so it was long enough to get to my living room couch.
Another controller that you might want to consider is a remote control. There are a few on the market ranging from simple remotes to do it all PC remote controllers. One of those multi-functional remotes that I had was the ATi Remote Wonder. This RCA like remote uses radio frequency also so you don’t have to point the remote to have it work. It features a USB receiver and even doubles as a wireless mouse. You can pick up one for around $50. The only problem is that the TV functions such as channel changing will only work with ATi TV products or so it says. We’ll see if there’s a PVR program out there that will allow you to use the ATi buttons to control the unit.
You’ll probably need a router and you might need a hub/switch if you want to share your broadband connection with your new PVR. I had the SMC 7040BR 4-port router to route my Internet traffic and stuck a cheapie old hub in the living room to share my connections with my PVR, XBOX, PS2, and my laptop. The router was purchased for $50 and the hub I can’t remember as I had it many years ago. You can get a good switch or hub these days for around $30 so let’s just pick that as the price.
I had to have a CD-Drive initially to install the OS so it was nice that my purchase of the old Gateway system had one intact and working. I made a boot disc on a CD so that way I wouldn’t need a floppy drive. A CD boot disk as saved me a lot of headaches and if you can, I suggest making one for those emergency situations.
For the operating system, I chose to go with Windows 2000. It’s stable, reliable, and doesn’t take up as much space as Windows XP. As much as I wanted to use Windows XP as I think it’s a very good OS, I had a spare copy of Windows 2000 to use after upgrading my own machine from Win2K. I would refrain from using Windows 98 SE as it’s not as stable as Win2K and you might need that stability if you plan on having your PVR running for a long period of time without shutting down.
There are a few PVR programs out there and here are a few you can check out:
SnapStream
CyberLink PowerVCR
Intervideo WinPVR
ShowShifter
In the end I chose ShowShifter. It’s not just a PVR program but does much more such as plays DVDs and music. It also features a GUI where the letters and buttons are nice and big for TV viewing. You can even skin it to however you like so you’re not stuck with how it looks. Another nice feature of the product is you can specify the codec to compress your shows saving space on the hard drive. Easy recording can be accomplished by the integration of TitanTV.com to the program. You’ll be able to get a list of upcoming shows and easily record with one click. It’s a pretty slick program and you can find out more info at their website.
As you can see from the picture, I can watch TV, pause live TV, and record all from a machine I put together through spare parts and some purchases. The output quality was ok and I can certainly get better parts to improve the picture quality. Recording worked as advertised and I can now use my web browser to log into my machine to set the programming. And everything is upgradeable so you’re not stuck with a unit that can’t change with the times. There are still some tweaks here and there but all in all I’ve recorded a good amount of shows with it. The unit’s fan noise is a little louder than I had wanted but it’s nothing that I can’t handle. There are a lot of fans out there that offer good cooling at lower decibels. The Dragon Orb does produce some loud noise though so that might be one of the first things I replace later on to make the system quieter. Hope this gives you a little taste on how to put together one.
Total Cost--
Case: $35
Paint: $3
Duron 1.2: $45
ECS K7S5A motherboard: $55
256 PC133 Ram: $40
Dragon Orb HSF: $25
WinTV PCI: $35
TNT2 w/ TV-out: $40
30 GIG HD: $60
Logitech Cordless Freedom Optical: $100
Windows 2000: $100
Showshifter: $50
Final Cost: $588 (router not included)
* The product in this article was sent to us by the developer/company.

About Author
I've been reviewing products since 1997 and started out at Gaming Nexus. As one of the original writers, I was tapped to do action games and hardware. Nowadays, I work with a great group of folks on here to bring to you news and reviews on all things PC and consoles.
As for what I enjoy, I love action and survival games. I'm more of a PC gamer now than I used to be, but still enjoy the occasional console fair. Lately, I've been really playing a ton of retro games after building an arcade cabinet for myself and the kids. There's some old games I love to revisit and the cabinet really does a great job at bringing back that nostalgic feeling of going to the arcade.
View Profile